Port Mapping
This is an advanced topic. Port mapping allows any user requests sent to specific remote ports to be redirected to local ports instead. Choose Tools - Mappings from the main menu to access this feature. Port mapping can be used for transparent proxying, access control, etc. This feature can also redirect new network users, who are not currently configured in the bandwidth manager, to a “Welcome” web-page with your own content. This should be particularly useful for wireless ISPs.
While the port mapping feature has many useful applications, the current implementation has a limitation: it does not process outgoing traffic.
Here are further details on how transparent proxying and unknown user redirect are implemented using port mapping:
Transparent proxying is a complex technical task. You will need to have a thorough understanding of what you are doing, as well as a good understanding of the TCP layer, the HTTP protocol and what is happening in the connection. Basically, you will need a Windows-based computer to act as a gateway. The Bandwidth Manager and a proxy server should be installed on this computer as shown in the example below:
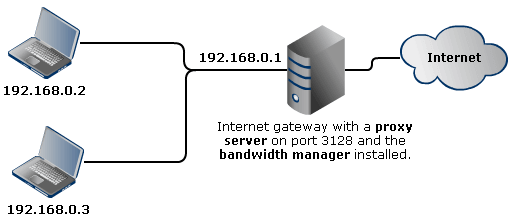
Here is a brief explanation for this example: You want the users with network addresses 192.168.0.2 and 192.168.0.3 to access the WWW through the proxy server. Currently, the users are able to access the WWW directly through the gateway. The proxy server runs on port 3128. First, you need to define a mapping which redirects data packets to local port 3128. Then set a rule for 192.168.0.2 and associate it with the mapping that was just defined. It looks like this:
- Source: 192.168.0.2
- Destination: Any address on port 80
- Protocol: TCP
- Interface: LAN
The rule for 192.168.0.3 will be similar. Now, if you have done everything correctly and the proxy server is properly configured, any HTTP request from 192.168.0.2 will be intercepted by the Bandwidth Manager and forwarded to the local proxy server through port 3128. The proxy server then analyses the request, downloads the requested information from the Internet, returns it to the Bandwidth Manager which, in turn, returns it to the user who initiated the request.
Note: configuring the proxy server is a separate task and is out of the scope of this document.
Unknown user redirect. This technique is very useful for wireless Internet service providers where new users can appear on the network at any time. You need a network configured like the one described above for transparent proxying. The workstations can be wired, wireless or a mixture.
Here is an example using the same network configuration as before. You want any new users who join your network to be redirected to a “Welcome” page where they can read how to pay for the Internet services you provide. You should run a local DHCP and web-server. Your current rule set should look like this:
Rule 1
- Source: 192.168.0.2
- Destination: Any IP address
- Protocol: TCP
- Interface: LAN
Rule 2
- Source: 192.168.0.3
- Destination: Any IP address
- Protocol: TCP
- Interface: LAN
Rule 3
- Rate: Unlimited
- Source: 192.168.0.0 – 192.168.0.255
- Destination: Any IP address on port 80
- Protocol: TCP
- Interface: LAN
Rule 4
- Rate: Blocked
- Source: 192.168.0.0 – 192.168.0.255
- Destination: Any IP address
- Protocol: TCP
- Interface: LAN
Rules 1 and 2 are associated with the existing workstations. Rule 3 must be associated with a port redirect to the specific local URL where your "Welcome" page is located. If, for example, the page is on host http://192.168.0.1/welcome.php, you need to define a mapping with this URL and associate it with the third rule. Any new user who is not listed in rules 1 and 2 will be allocated an address in the range 192.168.0.0 – 192.168.0.255 by the DHCP server. They will then be caught by the third rule and redirected to your "Welcome" web-page. Obviously this procedure works for HTTP requests only.