Scan ranges and modes
Before starting a scan, you need to specify which IP addresses to scan. The Network Scanner offers several ways to define address ranges and supports both IPv4 and IPv6.
Automatic detection
The quickest way to get started is to let the application detect your local IP range. Choose Options → IP Address → Auto Detect Local IP Range or click the Detect button ![]() in the toolbar.
in the toolbar.
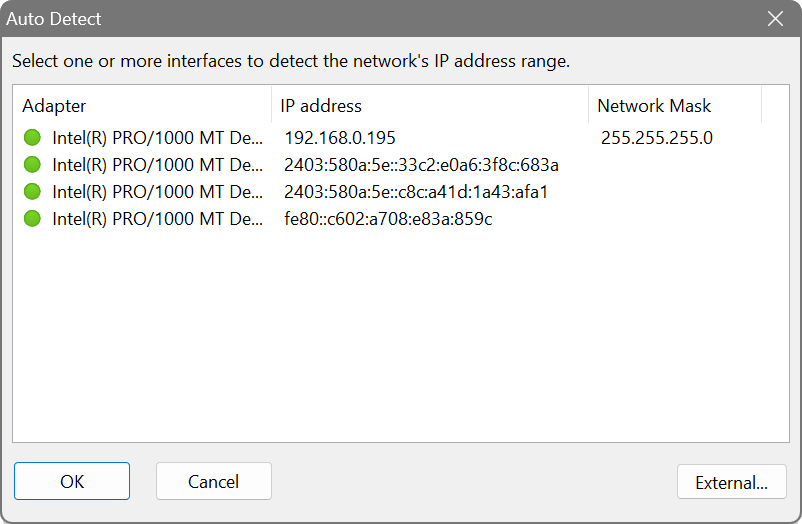
The dialog lists your local network adapters with their IP addresses and subnet masks. Select one or more adapters and click OK. The application will calculate the corresponding IP range and fill it into the address bar.

Detecting an IP range from a host name
Choose Options → IP Address → Detect IP Range from Host Name to resolve a host name (e.g. www.softperfect.com) to an IP address and use it as a scan target. This is handy when you know the server name but not the address.
Detecting your external IP address
If you are behind a router and need to find out your public IP address, click the External... button in the auto-detection dialog. This opens a dialog that queries the Cloudflare service to determine your external IPv4 and IPv6 addresses, along with geolocation information such as city, region and country. You can copy the result or use it directly as a scan target.
Manual entry
You can type IP address ranges directly into the address bar. The Add button ![]() adds a new range. Hold Ctrl while clicking it to add an IPv6 range.
adds a new range. Hold Ctrl while clicking it to add an IPv6 range.
Each range supports several input formats:
- Simple range: 192.168.1.1 to 192.168.1.254
- CIDR notation: 192.168.1.0/24
- Single address: 10.0.0.5 to 10.0.0.5
Use the CIDR button ![]() to convert between a range and CIDR notation.
to convert between a range and CIDR notation.
You can add multiple ranges and scan them all at once. Each range has its own enable/disable toggle and an optional comment (click the Comment button ![]() ). This is useful when you regularly scan the same set of subnets and want to label them.
). This is useful when you regularly scan the same set of subnets and want to label them.
Pasting IP addresses
Click the Paste button ![]() to paste an address from the clipboard. You can choose to use the address as-is, or expand it to a Class A, Class B or Class C range. For example, pasting 10.0.1.50 and choosing Class C creates the range 10.0.1.0–10.0.1.255. For IPv6 addresses, only the as-is option is available.
to paste an address from the clipboard. You can choose to use the address as-is, or expand it to a Class A, Class B or Class C range. For example, pasting 10.0.1.50 and choosing Class C creates the range 10.0.1.0–10.0.1.255. For IPv6 addresses, only the as-is option is available.
Importing addresses
To scan a specific list of hosts, choose File → Import IP/Host Name List. This opens a dialog where you can:
- Type or paste addresses directly into the text field, one per line.
- Load from file: import a text file containing IP addresses, ranges or host names.
- Get from Active Directory: query your domain controller via LDAP to retrieve computer objects automatically. This opens the Active Directory Import dialog where you enter a Base domain and a Filter expression. Several example filters are provided, such as “Name contains string”, “Windows 10 machines” and “Windows Servers”. Click Preview to see matching objects before importing them.

The following line formats are accepted, whether entered manually or loaded from a file:
| Format | Example | Interpretation |
|---|---|---|
| x.x.x.x | 10.0.0.1 | Single IPv4 address |
| x.x.x.x- |
10.0.0.1- |
IPv4 address range |
| x.x.x.x/y | 10.0.0.1/24 | IPv4 address/mask |
| x:x:x:x:x:x:x:x | 2001:db8::1 | Single IPv6 address |
| x:x:x:x:x:x:x:x- |
2001:db8::1- |
IPv6 address range |
| x:x:x:x:x:x:x:x/y | 2001:db8::/120 | IPv6 address/mask |
| hostname | google.com | Host name (resolved to an IP address) |
Any lines that do not match a recognised format are ignored.
Suppose your organisation has three branch offices with subnets 10.1.0.0/24, 10.2.0.0/24 and 10.3.0.0/24. Instead of scanning them one at a time, add all three ranges to the address bar and assign a comment to each (e.g. “London”, “Berlin”, “Sydney”). You can then disable or enable individual ranges as needed without retyping them.
Scanning modes
There are three scanning modes, depending on whether you use IPv4 ranges, IPv6 ranges or IPv6 neighbour discovery.
IPv4 address range
In this mode the Network Scanner sequentially scans every IP address from the lowest to the highest in the range. This is the default mode.

IPv6 address range
Likewise, the scanner runs from the lowest to the highest IPv6 address. Because the IPv6 address space is enormous, only the last four octets can vary. In practice this means scanning a range such as 2001:db8::1 to 2001:db8::ffff. This mode is useful when addresses are allocated by a DHCPv6 server within a known range.

IPv6 neighbour discovery
The scanner sends a multicast ping to ff02::1 and collects replies from all responding devices. It then scans each discovered address. This is handy for finding auto-configured (SLAAC) IPv6 devices whose addresses are not known in advance. To use this mode, select one of the local IPv6 addresses in the auto-detection dialog.

Octet range mode
The Scan Mode button ![]() toggles between regular range mode and octet range mode. In regular mode, every address between the start and end is scanned. In octet range mode, only addresses whose individual octets fall within the specified ranges are scanned.
toggles between regular range mode and octet range mode. In regular mode, every address between the start and end is scanned. In octet range mode, only addresses whose individual octets fall within the specified ranges are scanned.
For example, if you specify a range of 10.1.254.1 to 10.9.254.5 in octet range mode:
Octet 1: 10
Octet 2: 1–9
Octet 3: 254
Octet 4: 1–5
The scanner will scan:
10.1.254.1, 10.1.254.2, …, 10.1.254.5
10.2.254.1, 10.2.254.2, …, 10.2.254.5
…
10.9.254.1, 10.9.254.2, …, 10.9.254.5
This is useful when you have a large network and want to scan a specific device (e.g. the gateway) in each subnet.
Many organisations reserve .1 as the gateway and .2–.5 for infrastructure devices in every subnet. With octet range mode you can scan 10.0.0.1 to 10.0.255.5 to check only those addresses across all 256 subnets, skipping the thousands of workstation addresses in between.