Working with results
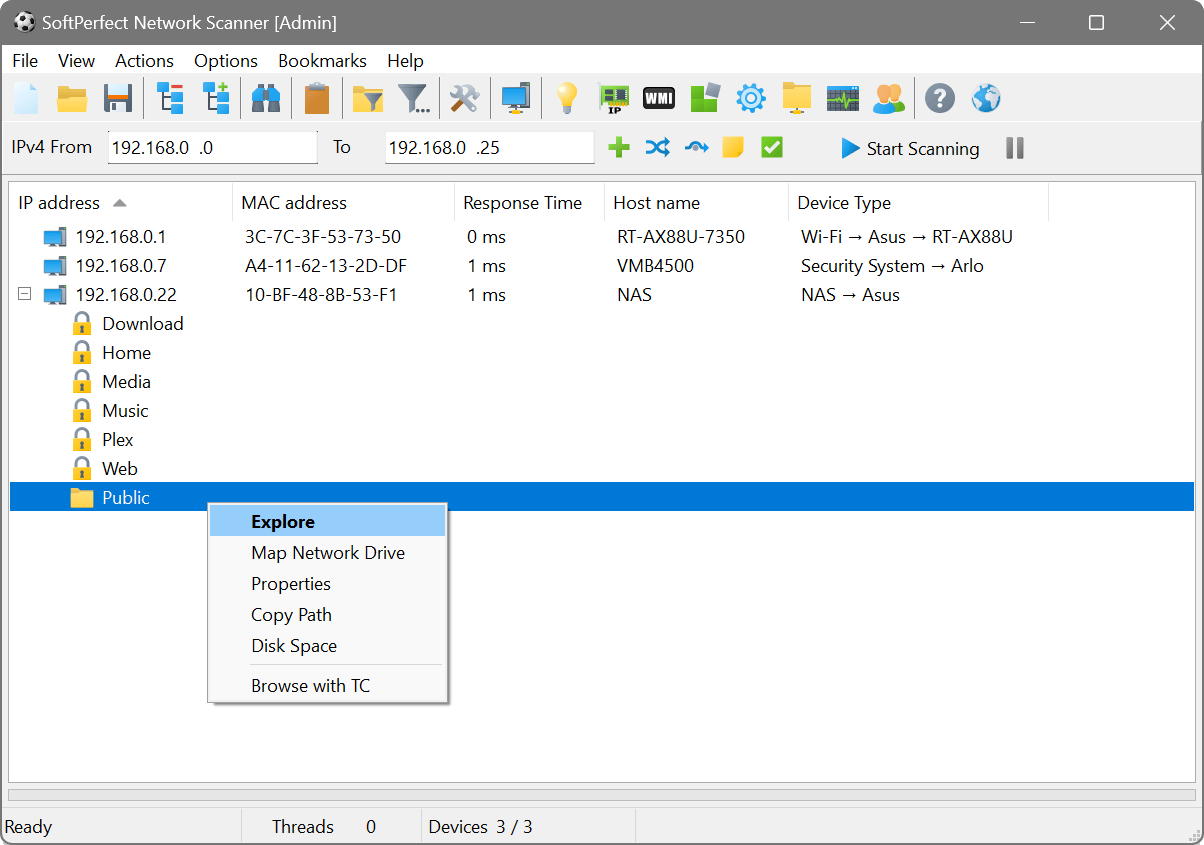
After a scan completes, the results area shows all discovered devices and the information gathered about them. Each device occupies a row, and each piece of information occupies a column. If shared-resource scanning is enabled, the tree can be expanded to show individual shares beneath each device.
Columns and sorting
The columns shown depend on which scan options and remote queries are enabled. Common columns include IP Address, Host Name, MAC Address, NIC Vendor, Response Time and any additional information you have chosen to collect.
Click a column header to sort results by that column. Click again to reverse the sort order. To remove sorting, right-click the column header and choose Remove Sorting.
When device history is enabled, an extra group of columns shows when each device was first and last seen on the current network and how often it has responded. Devices new to the network appear in bold, making newcomers easy to spot.
To choose which columns are visible, select View → Visible Columns from the menu. The dialog also lets you configure a regular expression and highlighting condition for each column.
You can lock one or more leftmost columns so they remain visible while scrolling horizontally. Use View → Freeze Columns and View → Unfreeze Columns.
Right-clicking a column header reveals a shortcut menu with additional options:
- Change Column View: customise the column’s appearance and apply a regular expression. See column appearance for details.
- Reset to Default View: remove any custom formatting from the column.
- Remove Sorting: clear the sort order.
Filtering results
There are several ways to filter the displayed results.
Quick Host Filter
The Shared Folders button ![]() in the toolbar hides all devices that have no shared resources. This is also available via View → Quick Host Filter → Shared Folders. The Settings item in the same submenu lets you manage your custom host filters.
in the toolbar hides all devices that have no shared resources. This is also available via View → Quick Host Filter → Shared Folders. The Settings item in the same submenu lets you manage your custom host filters.
Advanced filter panel
Click the Advanced filter button ![]() or press Ctrl+I to open the filter panel below the toolbar. It provides three drop-down fields:
or press Ctrl+I to open the filter panel below the toolbar. It provides three drop-down fields:
- Column: select which column to filter on.
- Operation: choose how to match (equals, contains, etc.).
- Value: enter or select the value to match against.
You can add multiple conditions to create compound filters. Matching rows are highlighted using the colour set in scan options on the View tab. The filter also works as a live search, with results highlighted as you type. Plus, you can show only the matching devices and hide everything else.
Shares filter
When shared-resource scanning is enabled, a dedicated filter panel appears below the advanced filter. It lets you filter by share type: Standard share, Writable share, Restricted share, Administrative share and Shared printer. You can choose Any type or select Specific types and tick the ones you need.
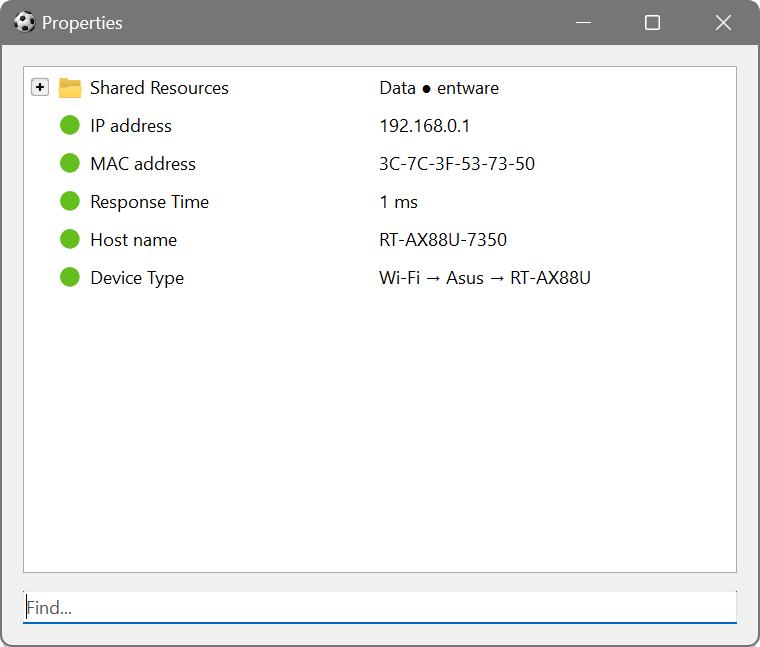
Device properties
To see all collected information about a device in one place, right-click it and choose Properties. This opens a two-column tree view showing every piece of data gathered during the scan. Use the search field at the bottom to find a specific property.
Device context menu
Right-clicking a device in the results opens a context menu with the following actions:
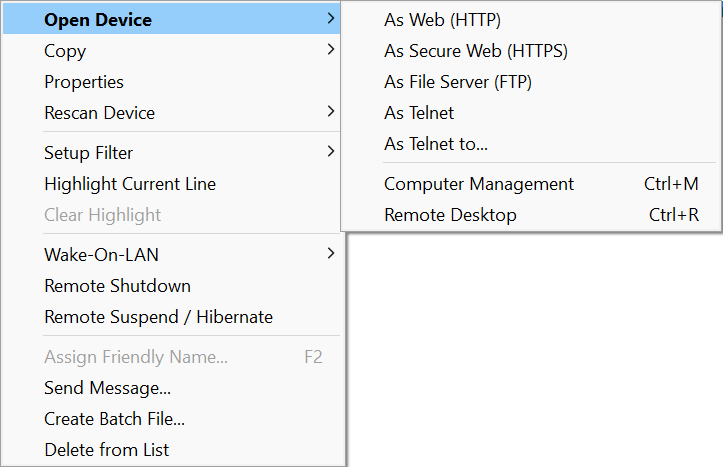
- Open Device: connect to the device as a web page (HTTP/HTTPS), FTP server, or via Telnet.
- Copy: copy the selected information to the clipboard.
- Properties: open the device properties viewer.
- Rescan Device: rescan the selected device.
- Setup Filter: quickly create a filter based on the selected cell.
- Highlight Current Line / Clear Highlight: mark rows for visual reference.
- Wake-On-LAN: send a wake-up signal or save the MAC address to the WOL manager.
- Remote Shutdown / Remote Suspend / Hibernate: power management for the device.
- Assign Friendly Name: give the device a descriptive label (shortcut: F2).
- Send Message: send a text message to the device.
- Create Batch File: generate a batch script for the selected devices.
- Delete from List: remove the device from the results.
When a shared folder is selected, the context menu shows Explore, Map Network Drive, Properties, Copy Path and Disk Space.
Many scan items can be quickly accessed without opening the corresponding manager. Right-click a column header and choose the Edit item at the bottom of the menu to jump directly to that item’s configuration.
Bulk actions
The Actions menu provides several bulk operations:
- Delete Inactive Devices
- Removes all devices that did not respond during the last scan. A confirmation dialog shows the number of items to be deleted.
- Disconnect Network Drive
- Opens the Windows network drive disconnection dialog, allowing you to unmap any currently connected network drives.
- Rescan All Displayed Devices
- Offers three rescan modes:
- Full Rescan: rescans every device currently listed in the results.
- Rescan Previously Undiscovered Devices: rescans only those addresses that were not successfully discovered in a previous round.
- Rescan Both Displayed and Undiscovered Devices: combines both of the above.
Per-column rescan
Right-click a device and open the Rescan Device submenu. In addition to a full rescan, the submenu dynamically lists every individual remote query column, so you can selectively rescan just one piece of information (e.g. only the WMI query or only the SNMP data) without re-running all other queries.
Legend
Choose View → Legend to display a colour-coded legend explaining the meaning of the icons and indicators used in the results.
Tree view
Use View → Tree to control how the results tree behaves:
- Auto Expand: automatically expand newly discovered devices.
- Collapse All: collapse every node in the tree.
- Expand All: expand every node in the tree.
Add the pre-configured Windows Name WMI query (SELECT Name FROM Win32_OperatingSystem), then run a scan. Once results appear, press Ctrl+I to open the filter panel. Select the Windows Name column, set the operation to Contains, and type the version you are looking for (e.g. “Windows 10”). Only matching devices will be highlighted.
In scan options on the Shares tab, enable Scan for shared resources, Check for write access and select Folders. After scanning, click the Shared Folders filter button ![]() to hide devices without shares. Expand each device to inspect its shared folders and their write access status.
to hide devices without shares. Expand each device to inspect its shared folders and their write access status.